

Posted by Christine Obbink-Huizer
Categories
material modeling | user-subroutines | fortran | Abaqus | compiler | Tips, Tricks & ApproachesTable of contents
This blog is on installing the Intel oneAPI Fortran compiler for use with Abaqus. It is an update of my previous blog, where some relevant information was only available in the comment section. This blog is intended to be used as a reference instead of the old blog.
Abaqus has many built-in options but sometimes these do not suffice. You may want to include a material model that is not implemented, have a complex type of loading that is not available by default or even define your own element. Abaqus' user subroutine capabilities allow you to do this. User subroutines are written in Fortran and in order to use them, you need a Fortran compiler. In this blog I'll show how to install a freely available Fortran compiler and link it to Abaqus. Thanks to Oliver Lundqvist working for Sweco in Finland for making me aware of this option, and to Raul Munoz for mentioning the last workaround.
I'll assume Abaqus is already running on your system. This was tested with Abaqus 2022. Previously, Abaqus 2020 and Abaqus 2019 were also tested.
Visual Studio Including Desktop Development With C++
First install Visual Studio, if this is not available yet. I used Visual Studio Community 2019 16.11.8.
Note: Visual Studio 2022 does NOT seem to work, use the link to access Visual Studio 2019.
Download and run the installer. Apart from the default also select the 'desktop development with C++' workload.
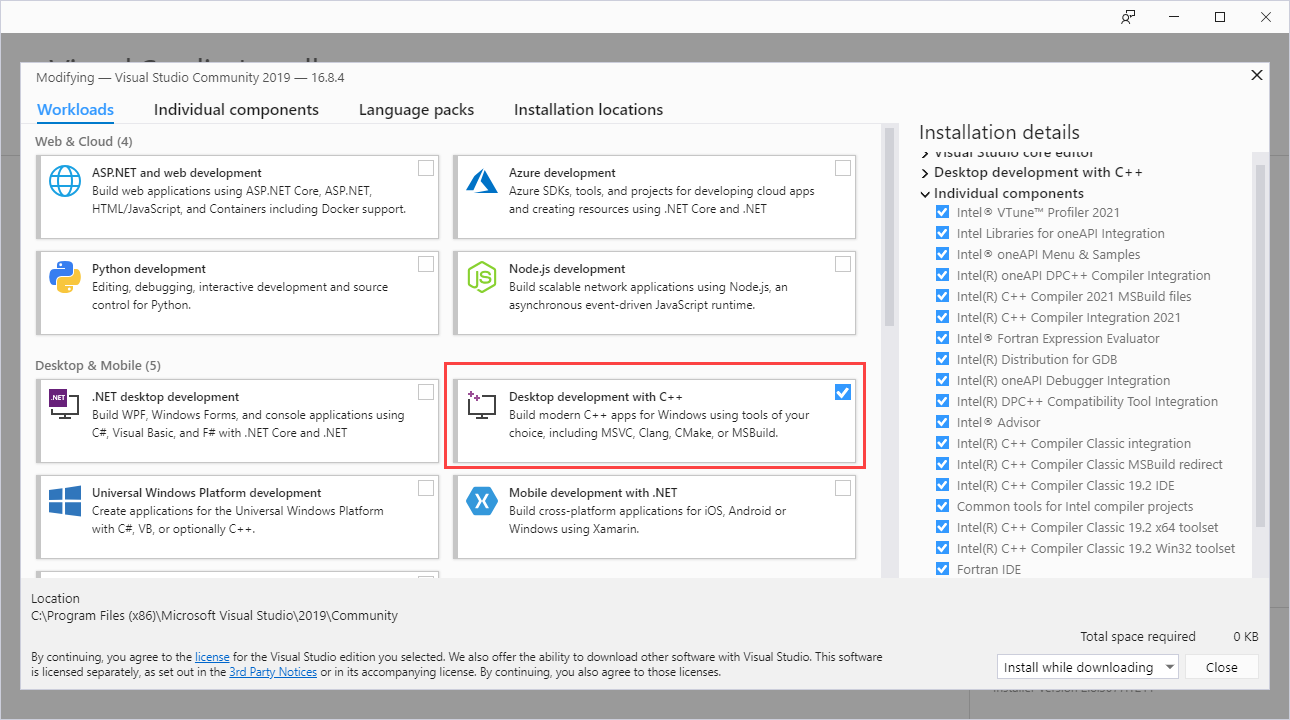
In case Visual Studio is installed but the mentioned workload isn't, you can use the Visual Studio Installer to add this specific component.
Intel oneAPI Base Toolkit
After Visual Studio is installed, download Intel oneAPI Base Toolkit. Make sure you are not logged in to this website when trying to access the download, and click 'Continue as guest (download starts immediately)' rather than 'Sign in or sign up'. (For more info on where this remark comes from, click here). Install the software; I used the recommended installation. If you do not have the 'desktop development with C++ workload' the installer will tell you so. Select the version of Visual Studio that is installed (2022 in this case) and start the installation. This takes some time.
Intel oneAPI HPC Toolkit
The next step is to download and install oneAPI HPC Toolkit. This process is similar to the previous step, but should be faster since it only installs an add-on.
Coupling
Now that the software is installed, Abaqus still needs to be able to find the compiler. To do this, first locate the file 'vars.bat'. In my case it was located here:
C:\Program Files (x86)\Intel\oneAPI\compiler\latest\env\vars.bat
Now you need to ensure that the following command is run before starting up Abaqus
"C:\Program Files (x86)\Intel\oneAPI\compiler\latest\env\vars.bat" intel64 vs2019
Here the first part of the command is the location of the vars.bat file, and the last part (vs2019) refers to the Visual Studio version (in my case Visual Studio 2019).
You can run this command manually in the command line before you run Abaqus, but it is easier to do it automatically.
When Abaqus is run, Abaqus.bat is called (located here: C:\SIMULIA\Commands by default). To be able to use the Fortran compiler, I added a line of code to this file:

(The command as mentioned previously, but including @call )
Checking Whether This Works Properly
Usually the best way to check whether everything is set up correctly, is to run the Abaqus verify command from the command line, e.g.:
Abaqus verify -all
to verify the complete installation, or
Abaqus verify -user_std
Abaqus verify -user_exp
to verify Abaqus/Standard with user subroutines or Abaqus/Explicit with user subroutines respecitvely.
This only works after the modification to Abaqus.bat has been made.
Of course you can also test with your own example problem.
Tips and Tricks 1
In the past this did not always work, with issues related to uppercase and lowercase letters. The user subroutine(s) could then not be found. If the .log file shows that the compiler is linked, and the .msg file mentions that the user subroutine is missing, then try this workaround (mentioned by Raul Munoz on our previous blog):
The following line can be added at the end of your environment file:
compile_fortran += ['/names:lowercase',]
This should be added to an environment file that is currently used, so a file named abaqus_v6.env in the user's home directory or in the current work directory, or custom_v6.env in e.g. C:\SIMULIA\EstProducts\2020\win_b64\SMA\site. Add the line at the end of an existing file, or create a new file if it does not exist. If the modification is made in custom_v6.env it will be available for all users on the system, in the user's home directory it will be available for all of the user's jobs and in the working directory it is only available for jobs run from that directory.
Tips and Tricks 2
We have also experienced cases where a linker error occurred, and user32.lib could not be found:
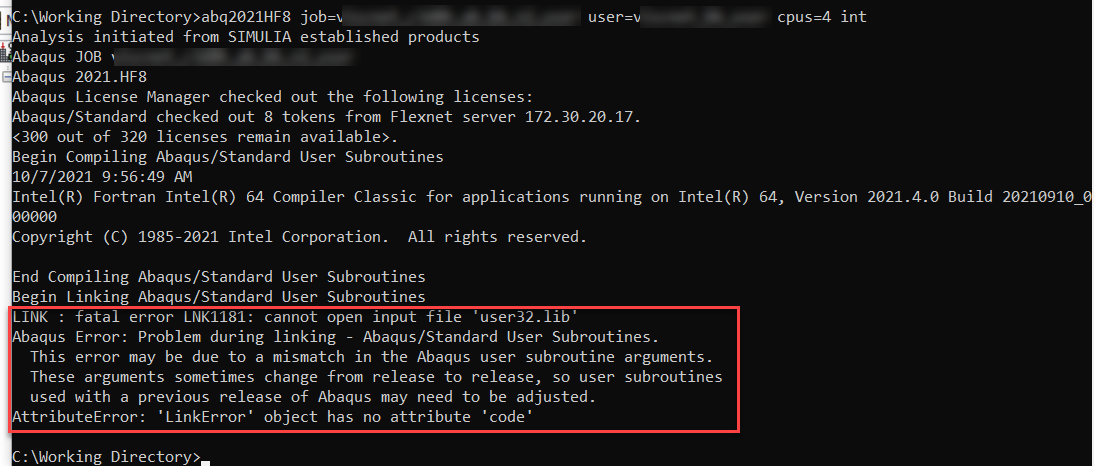
To solve this, add the following to a windows system environment variable ‘Lib’:
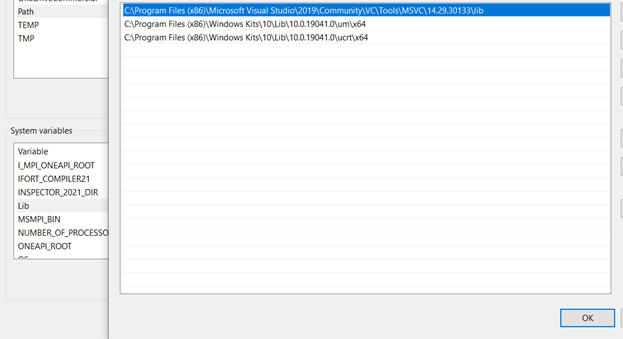
More information on setting an environment variable can be found e.g. here.


TECHNIA Simulation provides top tier FEA, Non-linear, and Advanced Simulation Software, Training, and Consultancy. Our dedicated team of more than 65 Simulation experts across 16 countries advise and support your innovation with a wealth of specialist knowledge and experience.
About TECHNIA- Related news and articles straight to your inbox
- Hints, tips & how-tos
- Thought leadership articles

Helping you find the information you’re looking for. Discover webinars, events, FAQ's, case studies and tutorials.
VIEW HUB